


Underwater Painting
Aug 20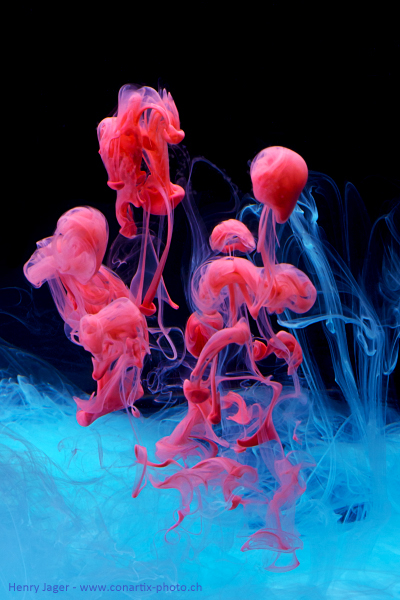
Weightless, we float through the ocean, watching the beautiful reef and the amazing marine life. It’s time to dream: A dream of painting the world. Close your eyes and take out the paintbrush, take out all your colors, and start painting – underwater. Imagine how the paint floats with you, easy, cloudy and slightly changing shape.
Underwater photographers live with the fascination of the life-giving element – water. So do I. And when I’m put into the dry world, my thoughts are circling around water driven photography. My recent studio project is about underwater painting. It’s my great pleasure to show you some of my works, give you some tricks, and inspire you to create your own experiments.

Artificial Jellyfish: Simple drops of colored cream poured into water form bizarre shapes we all know from the underwater world. Olympus OM-D E-M5, m.Zuiko Macro 60mm, 1/125s, f/10, ISO-200
Observing the Clouds
All we need to start is a transparent bowl, either glass or plastic (mine is roughly about 30cm x 20cm and 16cm high (12″ x 8″ x 6.5″)), water, cream, food color, salt, and of course the photo equipment including at least two remote strobes. I chose to mount my m.Zuiko 60mm macro lens on the Olympus OM-D E-M5.
I recommend starting by observing of the behavior of the drops. Pour some colored cream into the water and watch how beautifully it sinks: speed and shape.

Underwater Painting – Reflection: Red and Blue colored cream poured into salt water create amazing shapes. Olympus OM-D E-M5, m.Zuiko Macro 60mm, 1/200s, f/18, ISO-200
Driving the System
It’s an incredible new experience watching colored cream sink and trying to photograph the underwater paintings. Did the show pass too quickly? Consider our experience in diving. We use different weights to adjust buoyancy whether we dive in salt water or in freshwater. Likewise, we adjust the speed and diffusion of the colored cream with… salt.
The more salt you add to the water, the slower the drops fall. The clouds are more voluminous. You will find a point where they even turn around and start to ascend! In my experiments, I used 50g – 320g salt in about 8 liter water.
Slowing down the system allows you to add the paint carefully. That means real painting, not just pouring color into the water. I used Pasteur pipettes with latex bulbs to handle the cream. They are very useful, especially for placing the cream at different places under water without pouring it through the surface. A spoon works perfect for pouring as well.
The fat content of your cream influences your paintings a lot. Same with the speed you pour/inject the cream into your painting.
Stimulate your Phantasy
Underwater painting shows more than just clouds. The selection of colors and lighting influences your mood. Imaginations and associations arise. Sometimes, especially when working with filigree structures, real life figures enter your imagination. A smurf appears or even an entire squabbling family.


“Smurf” and “Communication”: Red colored cream is slowly poured into slightly salted water to get filigrane structures which create your phantasy. Olympus OM-D E-M5, m.Zuiko Macro 60mm, Smurf: 1/160s, f/20, ISO-200. Communication: 1/160s, f/10, ISO-200.
Camera Position
I placed the camera on a tripod with an upward angle in front of the bowl, so that the frame covers about 10 x 7.5 cm including some of the surface of the water. Two flashes are put at the sides of the bowl. Behind the bowl, I placed a black fabric to eliminate disturbing light. This is just one setup for “underwater painting” photography, but there are many more to experiment with!
Play with Lighting
There are two creative lighting setups I find to work really well: top and bottom strobe positions. For the bottom position, I placed my bowl on a mat of Plexiglas propped up on wooden blocks and placed the strobe under the bowl. For the top lighting, I kept the flash in my hand above the bowl. Try to use different angles and be aware of reflections the bowl causes. A lot of experience brings success!

“Jelly”: It looks a bit like a galactic jelly because of the flash directed from top. Olympus OM-D E-M5, m.Zuiko Macro 60mm, Smurf: 1/200s, f/18, ISO-200.
Catch the Best Moment
Only an octopus can handle multicolor painting, lighting and taking picture at the same time. Even if you use a remote cable (or control), underwater painting involves much multitasking. It’s almost guaranteed that you’ll miss the shot when your painting is at its best when controlling everything manually. To eliminate this problem, I set the camera on “sequential shooting, low, 2 frames per second”. This is a good compromise between having enough pictures and allowing your flashes to recycle before the next shot. With this method you can easily paint while the camera takes the pictures automatically.

“Red ‘n Blue”: Composition is essential to success with underwater paintings as it is with every picture, painted or photographed. Pay attention to the color combination to get your eye catching shot! Olympus OM-D E-M5, m.Zuiko Macro 60mm, Smurf: 1/160s, f/22, ISO-200
A Moving Impression
“Underwater Painting” is about the behavior of a colored liquid (emulsion) in water. This animated Gif gives you an impression of the described shooting. The movements are faster than in reality. The picture were taken at 2 fps and presented here at 7 fps.
")
Outlook
There are many more versions to be created. Think of colored backgrounds, more shapes, more lighting experiments, and last but not least other liquids to be poured into the water. I wish you happy shooting!

“Color Splash”: From filigree structures to real fireworks of color, from simple light to surprising flash angles: No limits are put to your creativity. Have fun! Olympus OM-D E-M5, m.Zuiko Macro 60mm, Smurf: 1/200s, f/20, ISO-200
Henry Jager is a passionate underwater and wildlife photographer with an incredible sense for an unexpected view on the subjects. He is 43 years old and lives with his wife and two children near Zurich, Switzerland.
His work can be seen at www.conartix-photo.ch


Related Articles
Popular Articles