


Dome Ports: Acrylic vs Glass
Jun 17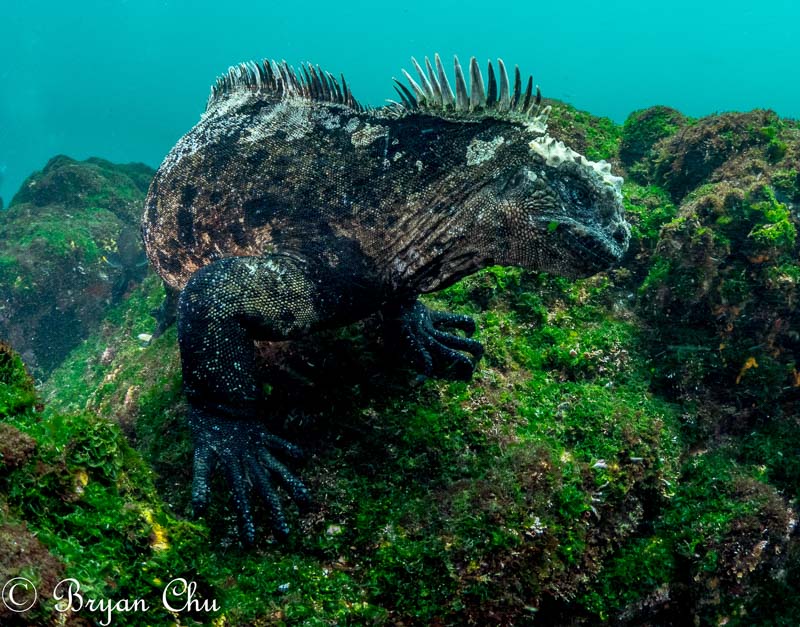
Dome Port Basics
As anyone who has used a dome port is probably aware, they are notoriously prone to scratching. So why even use one in the first place, when a flat port is much easier to care for? Optics, optics, optics. Flat ports magnify images underwater by about 30%, due to light refraction. This is why things look larger underwater than they really are – because scuba masks are basically large flat ports in front of your eyes. Dome ports avoid this issue, meaning that they maintain the wide field of view of a wide angle lens underwater. (See Dome Ports and Wide Angle Optics and Dome Ports vs Flat ports on the UWPG for more technical info than you thought was possible).
A wider field of view allows you to get closer to your subjects, meaning sharper images due to less water between camera and subject, and better lighting due to less distance for light to travel between your strobes, the subject and the camera lens. Most importantly, good luck trying to put a fisheye lens behind a flat port – and as I wrote in a previous blog post, Why You Should Use a Fisheye Lens for Wide Angle Shooting – in my opinion, as well as that of many professional underwater photographers, the fisheye is the best wide angle option out there! So, that is why a dome port is essential for taking great underwater images.
Acrylic vs Glass
So now, should you go with acrylic or glass? Acrylic ports are a lot cheaper, lighter, and generally smaller, but they are less robust and much easier to scratch. Glass dome ports are more expensive, heavier, and often larger, as well as much more scratch resistant and better at shedding water…and manufacturers claim they have better optics. Take that claim of optics with a grain of salt though, as our test of Sea & Sea Glass vs Acrylic dome port image quality found basically no difference.
As someone who has used both a glass and an acrylic dome port with my Olympus OM-D E-M1, Olympus 8mm Fisheye lens, and Nauticam OM-D E-M1 underwater housing, my preference is for the glass dome port over the acrylic, despite the more expensive cost. (Here is what I have used: Nauticam 140mm N85 Optical Glass dome port and Nauticam 4″ fisheye dome port). I prefer glass because of the durability and the better shedding of water. Let’s talk about each of those.
Durability
First is durability. I started off using an acrylic dome port, and got some scratches on it. I tried to remove the scratches with a micromesh kit, but ended up creating an irreparable mess. I had a Bluewater Galapagos photo workshop coming up, which I knew could have crazy currents and surge, so I decided to try a glass port for its scratch resistance. The diving was amazing – check out the Bluewater Travel Galapagos diving guide for more info. And, as expected, I got banged about on the rocks at a number of dive sites.
Unfortunately, I had not yet learned my lesson about prioritizing my dome port over photos, so I picked up a couple of scratches. However, I know with an acrylic port it would have been a lot worse, as a number of the times I scraped my dome port on the barnacles or the rocks, no damage was done to the glass. Another trip attendee had an acrylic port, and scratched it so badly he had to move his focus point off to the side, otherwise his camera just focused on the scratch on the port!
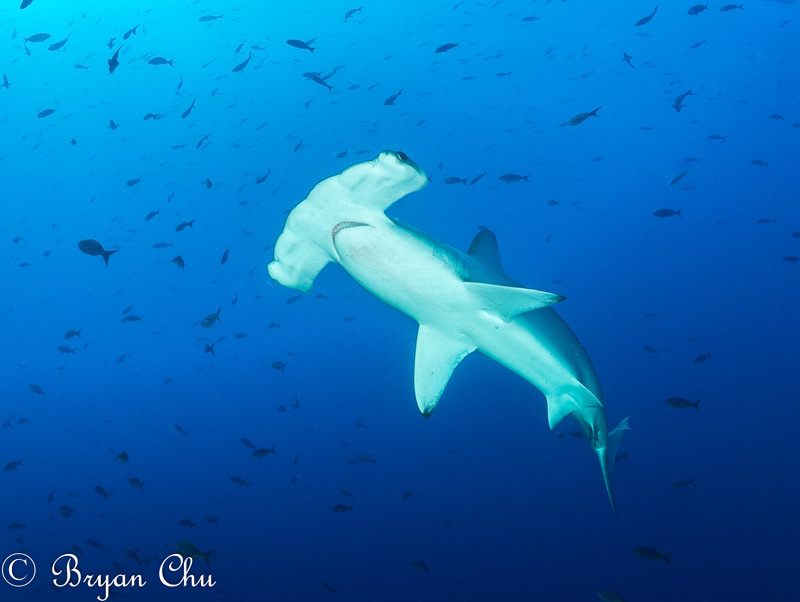
I captured this hammerhead at Wolf Island, a couple of dives after getting battered around and picking up my first scratch on my new glass port.
Protect your Dome!
Despite getting some scratches, I was still able to take lots of great photos on the trip, and just had to remove some scratch bits and pieces from some images in Lightroom/Photoshop. From this trip I learned a really important lesson – always protect the dome port!
Now when diving somewhere like Komodo, where it’s time to go into some heavy current, I put my neoprene dome port cover on my port before letting go of the rocks, so that in case I lose control of my camera, the port will be protected. I always have my camera passed to me from the boat with the dome port cover on, and take it off as I descend. I put it over my wrist, where it fits nicely (please note, if your dome port cover fits too loosely over your wrist, you might lose it – in that case, put it down the neck of your wetsuit). Then, at any point where the conditions seem crazy, I put the cover back on, and I always put it on at the end of the dive before I pass my camera back on to the boat.

Having my glass dome port while diving with the marine iguanas was a life-saver. I have never been smashed around so much on the rocks, and port survived without any significant damage despite quite a few bumps.
Since the Galapagos I have scratched my port a few more times, diving in places like Fakarava, but most have not done much of any permanent damage. And speaking of Fakarava and the Galapagos, both are amazing places for shark diving, landing on the Top 5 Shark Diving Destinations in the World over at Bluewater Travel.
Now that I am extremely careful with my port, I have pretty much stopped hitting it on stuff. I don’t think I have really lost any shots to the scratches on my port, but those original scrapes from the Galapagos do cause me to spend a few minutes editing some of the photos which they show up in, and that time does add up. So now I am looking at getting a new glass port, which I will keep immaculate, and any time I have a crazy dive, I will put on the old scratched port and just remove the scratches in post.
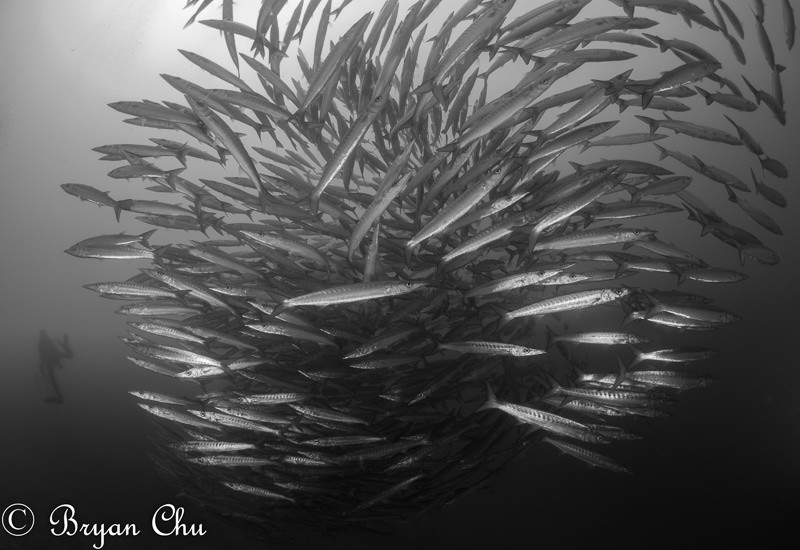
I didn’t notice any scratches on the image while taking this photo with my now non-immaculate port.
Shedding Water
This brings me to the second reason I picked glass, and that is the ability to shed water. Split shots are a really cool way to show the underwater world through a different lens, and something every underwater photographer should try to add to their portfolio. Here’s a great tutorial about shooting split shots (over-unders).
Large dome ports are best for split shots, and with smaller dome ports like the ones I have used, split shots can only really be taken in relatively calm conditions. But in the right conditions, the glass port can take some great shots. Here is one from Greenland, where we had very calm water. With the glass port, I fully immerse it in the water, and then pull it half out of the water and take a few shots right away. Using this technique I rarely get any water drops in my photos.
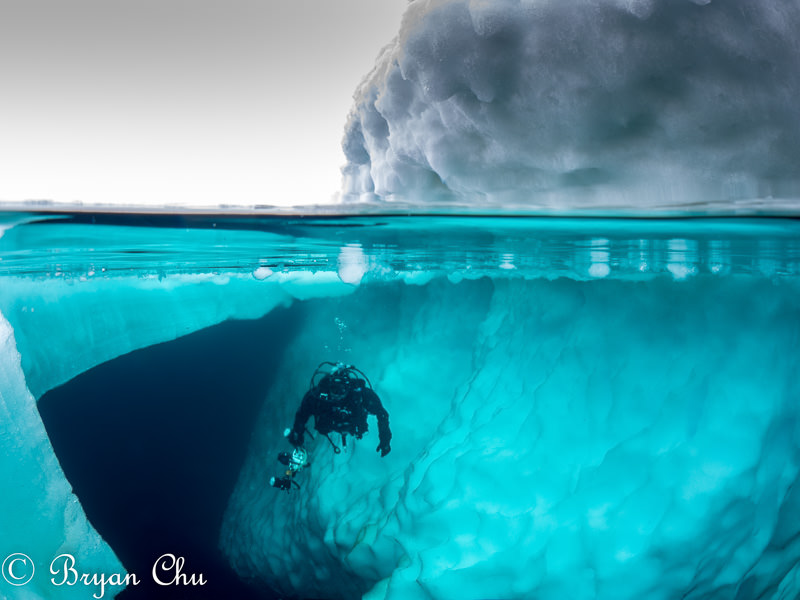
Other than the -3 C water, this split shot was very easy to capture with my glass dome port.
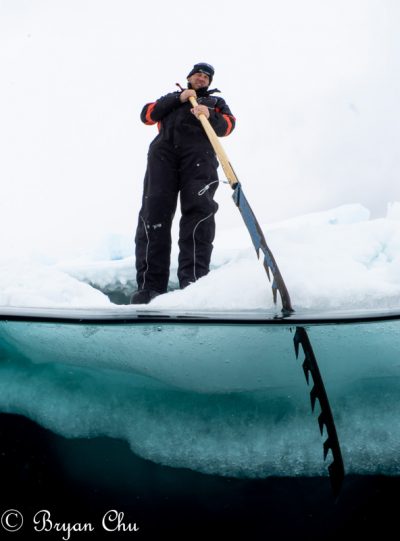
Other than the -3 C water, this split shot was very easy to capture with my glass dome port.
Final Thoughts
Whether you go with glass or acrylic, as long as you protect your dome port, you will be able to take great photos. The important thing is to know your limitations and how to best use the equipment you get. If you get the acrylic port, you may learn that it’s not worth your time trying to take any split shots unless the water is mirror-flat, but enjoy the advantages of the smaller, lighter and cheaper equipment. Or you may figure out a technique that works for you. If you get the glass port, then you will be able to get better split shots, and shrug off a good amount of the contact between the port and rocks/coral (but still do your best to protect it!).
Happy shooting, and always feel free to email me with questions. bryan@uwphotographyguide.com


Related Articles
Popular Articles