Canon EOS R10 and R7 Underwater Settings
Posted by Nirupam Nigam on January 24th, 2023
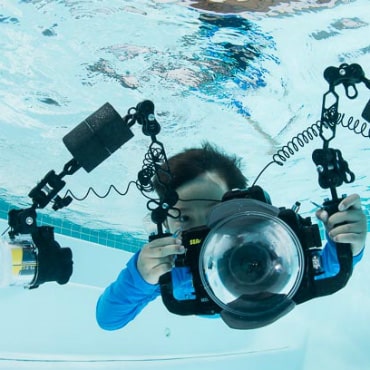
The Canon EOS R7 and R10 are two popular new APS-C mirrorless cameras from Canon. They represent some of the best value options on the market for underwater photographers, at a more affordable price point than the popular Canon EOS R5 and Canon R6. Here are our top settings and tips for taking your Canon R7 or R10 underwater. While these cameras do differ slightly, their control layout is very similar, and most underwater settings are going to remain the same between the two cameras.
Adjusting ISO, Aperture, Shutter Speed, and Autofocus

All Canon cameras have very straightforward ergonomics. It's important to note a couple of important buttons and dials that are frequently used underwater. In order to change your aperture and shutter speed, both the R7 and R10 have a front and back dial on the starboard side of the camera. In the R7, the aperture dial (on the back) is integrated with the autofocus joystick. You can switch what dial controls aperture and what dial controls shutter speed by going into the main menu -> select the orange customization menu -> select "customize dials." You can select "customize buttons" in the orange menu to reassign or customize any buttons on your camera.
To change ISO underwater, you either need to press the "up" button on the D-Pad on the R10, or click the ISO button on the top of the camera on the R7. There is no dedicated ISO dial like on the R5.
To make the camera autofocus, we recommend hitting the back "AF ON" button on both the R7 and R10. Your housing will have a built in lever that is dedicated to the AF-ON button. This will allow you to select focus at any time before hitting the shutter button. If you have a housing compatible with the AF joystick (like the Nauticam R7 housing), you can move your autofocus point with the AF joystick. If your housing is not compatible with the AF joystick, then we recommend using AF servo mode (described below). Autofocus tracking will begin automatically so all you need to do is align the autofocus box with your subject, press the AF-ON lever, hold the lever, and the camera will follow the subject around with the autofocus box.
The info button will change what is displayed on your LCD or viewfinder.
Finally, the mode dial at the top of the camera allows you to select if you are shooting in automatic mode, movie mode, or manual mode. We recommend shooting in manual mode (M). Please read our tutorials on the Underwater Photography Guide to learn how to shoot manual photos underwater.
The Q Menu
The Q Menu
The Q menu, also known as the "quick" menu is the most important menu for you when you are shooting underwater. It allows you to access your most important underwater settings in the field, with the press of one button. It is located in the center of the D-Pad on the back.
Important Q menu settings:
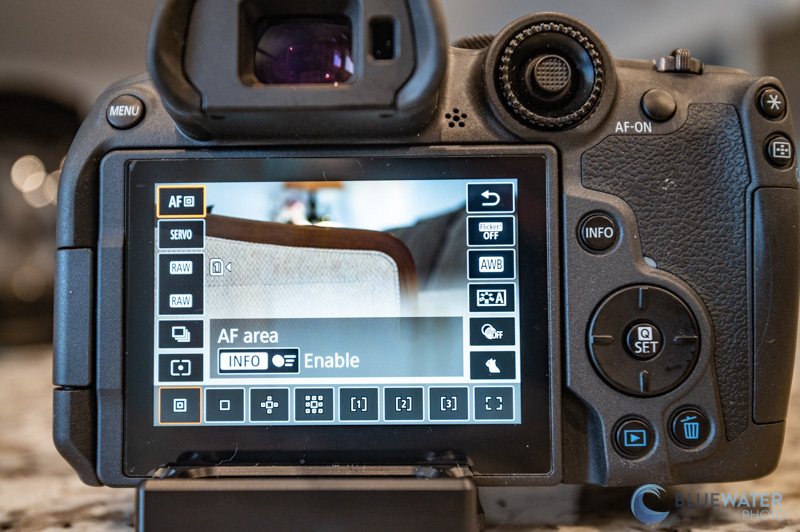
- AF area - This setting allows you to select the area that your camera will be searching for autofocus from. We typical shot with spot AF as this was the most accurate. However if you are shooting quick animals, then Expand AF Area: Around is a good choice.
- AF operation - This setting determines whether your camera will wait to take a photo until your focus locks on the subject (one shot), or if your camera will continuously focus (AF servo). AF servo on the Canon R7 and R10 also activates the autofocus tracking mode. We highly recommend using AF servo and autofocus tracking. It's very accurate on the R7 and R10 and allows you to follow your subject around with your AF focusing box. If the subject moves, your camera will adjust accordingly.
- Image quality - shoot RAW! This will give you better results when you are editing. Only shoot JPEG if you don't want to edit your photo ever in the future. You will need to edit your photos if you are shooting RAW. You can also choose to shoot both RAW and JPEG
- Movie recording size - we recommend filming 4K/59.97p. However, the R10 will only allow you to select 4K/29.97 in photo mode. You will need to switch to movie mode on your mode dial to film 4K/59.97 on the R10.
- Metering mode - choose spot metering if you are shooting with strobes
- Still image aspect ratio - keep this on 3:2 to use the whole width of the sensor
- Anti-flicker shoot - off
- White Balance - keep this on auto white balance with strobes. If you are shooting video and want to do a manual white balance change from the photo mode - click custom, and then click "menu" twice while lining the box up with a white slate.
- Picture style - this only affects JPEGs and we recommend "standard"
- Creative filters - off
- Subject to detect - animals
The Main Menu
Your main menu, accessed by the "menu" button, is much more extensive than the Q menu. Typically you only need to adjust settings here once before a dive trip and not underwater. Here are some important settings found in the main menu for underwater photography.
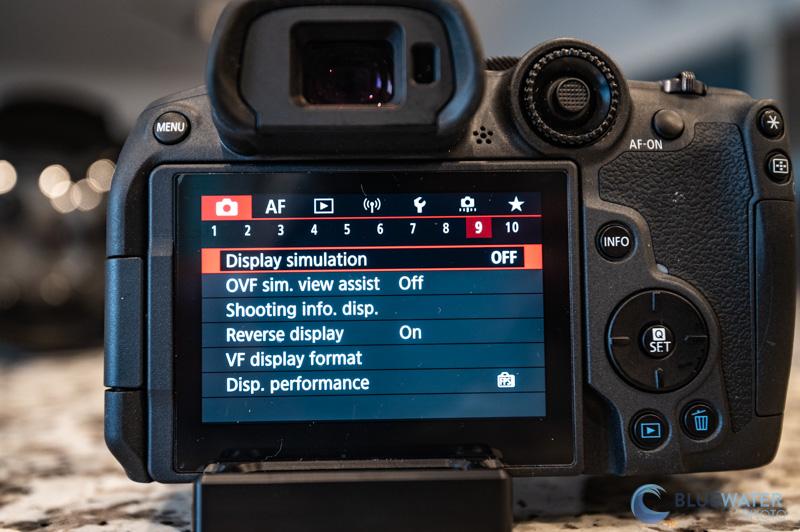
The Red Photo Menu
Image quality - this setting allows you to shoot in RAW vs JPEG. Shoot in RAW!

Flash control - if you are shooting with strobes, keep this on your default settings.
Custom white balance - if you are in movie mode and shooting video, use this to use the last photo you took of a white slate to set your custom white balance.
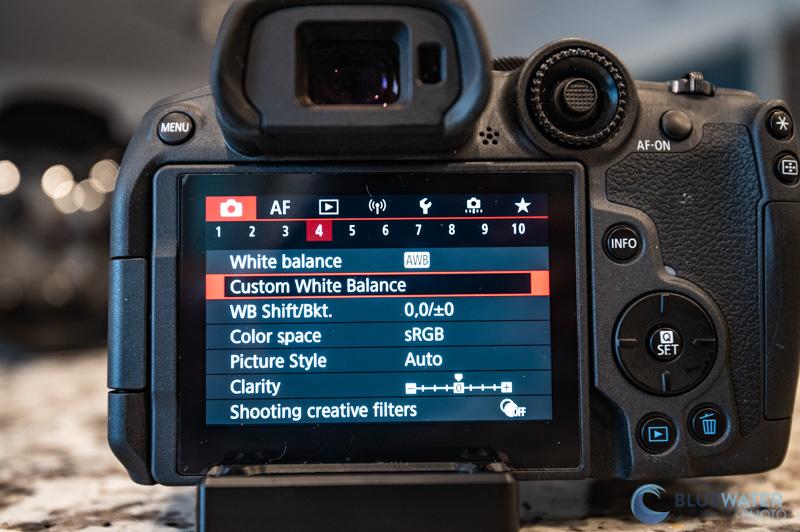
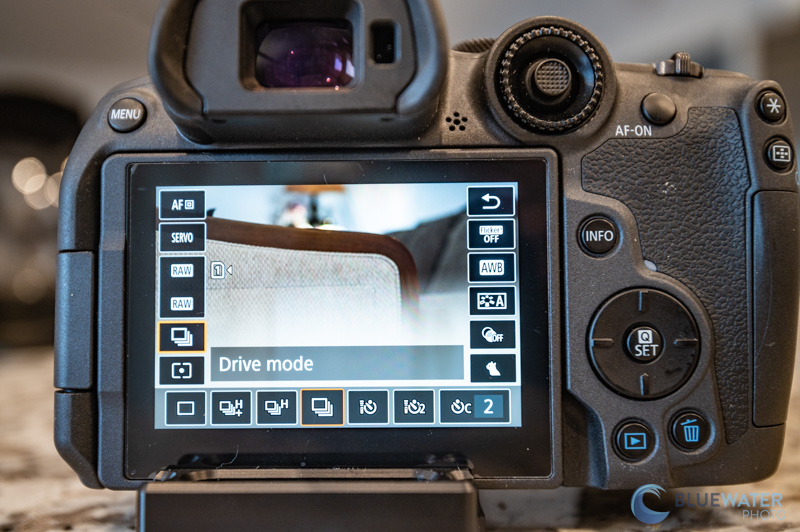
Drive Mode - Low speed continuous will help you capture action with burst shooting when you hold down the shutter button with your strobes (mostly) keeping up
IS (Image Stabilization) mode - make sure in-body image-stabilization is turned on if you have the R7, but don't use digital stabilization as it crops in and makes things warpy.
Display Simulation - MAKE SURE THIS SETTING IS OFF WHEN SHOOTING WITH STROBES UNDERWATER. Otherwise your LCD or viewfinder will look dark. Turn it back on (Exposure) when shooting above water (or without strobes) so you can accurately see how your photo will be exposed.
Movie recording size - 4K, 59.97p, IPB is what we recommend underwater. If you are shooting with the R10, you will need to change the mode dial to movie mode to access this.
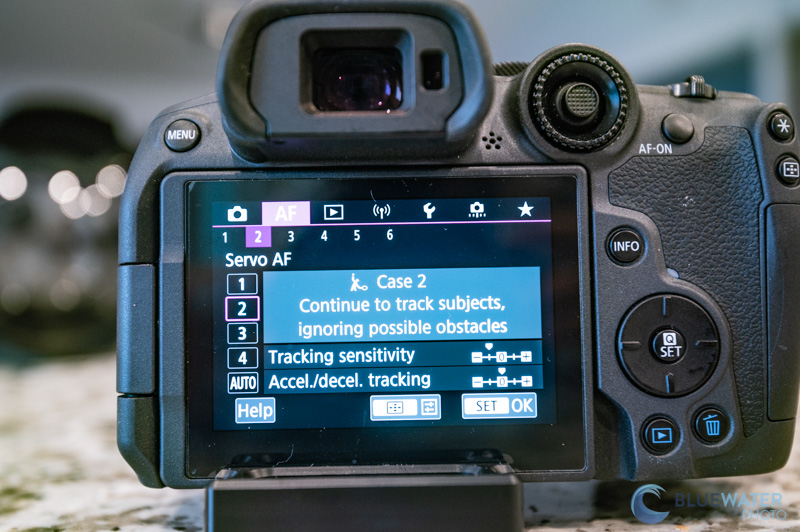
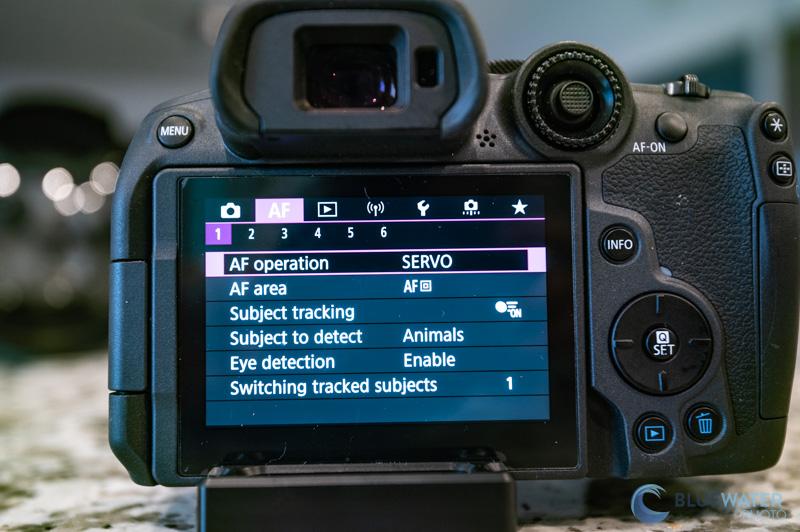
The Magenta Autofocus Menu
Subject Tracking - turn this on
Subject to Detect - animals
Eye detection - enable
Serve AF case (in the second panel) - Case 2
AF-assist beam firing - off (your camera is in a housing)
Touch & drag AF settings - off (your camera is in a housing)
Blue Playback Menu
Leave these settings on default.
Purple Connection Menu
Leave these settings on default.
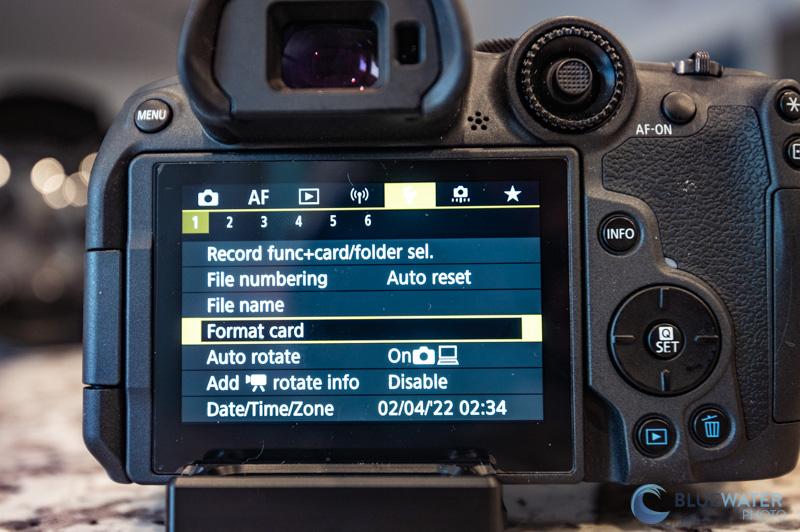
Yellow Wrench Menu
Format card - this will delete all photos from your SD card and format it so that it works smoothly with your camera. Be careful when using with setting.
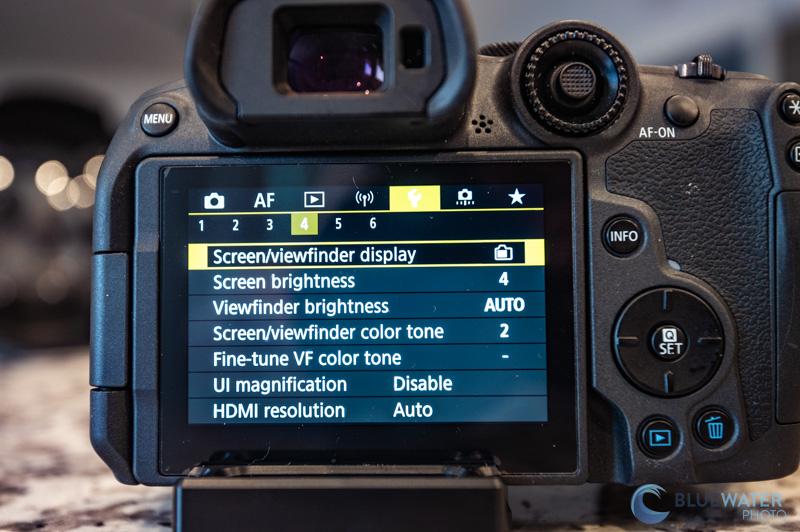
Screen/Viewfinder Display - This allows you to switch between your electronic viewfinder (EVF) and your LCD screen. We prefer the LCD screen unless we're shooting with a magnified viewfinder. Select "screen". If your LCD ever appears dark, it could be that your camera is auto rotating to the viewfinder when the sensor is blocked by the housing.
Custom shooting mode - You can save all your current settings to the C1 or C2 settings on your mode dial to quickly jump to your saved settings. Click "register settings" to do this.
Battery into - tells you your battery life
Orange Customization Menu
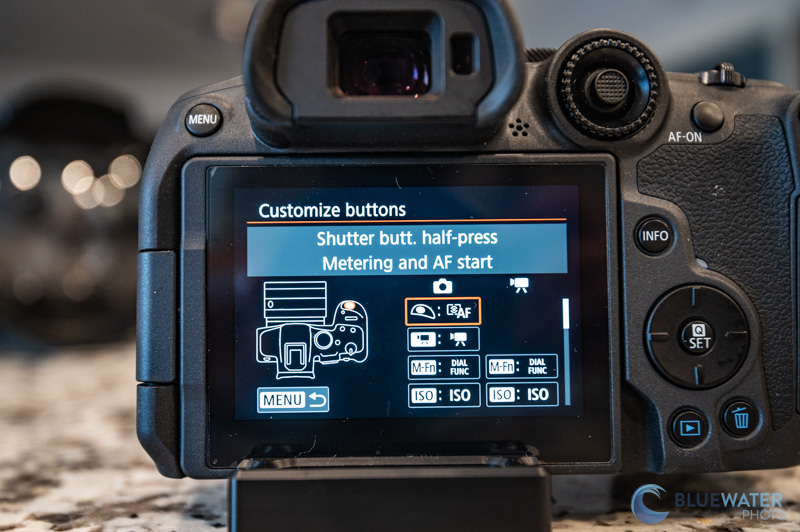
Customize buttons - this allows you to assign custom buttons or change button functions on the camera
Customize dials - this allows you to switch the functions of your aperture and shutter speed dial. This can be useful if one of your dials is not working underwater.
Green Star Menu
Keep this in the default settings.
Shooting Video
Both the Canon EOS R10 and EOS R7 are excellent underwater video cameras. The R7 particularly shines bright for underwater videography. To unlock all video features make sure you select "movie mode" on the mode control dial.
Like with photography, the Q menu will give you access to important settings for shooting underwater video. We recommend selecting the Q button and then selecting "whole area AF" for your AF area mode. For movie recording mode (also found in the Q menu), we recommend selecting 4K/59.94 with a crop, IPB on the R10 and the same setting on the R7 (which will not have a crop).
If you like to do a lot of post processing in your video to capture more details, we recommend turning C-Log recording on with the Canon R7. This can be accessed from your main menu in the Red shooting menu.