Nikon Z8 Underwater Settings
Posted by Nirupam Nigam on July 18th, 2023

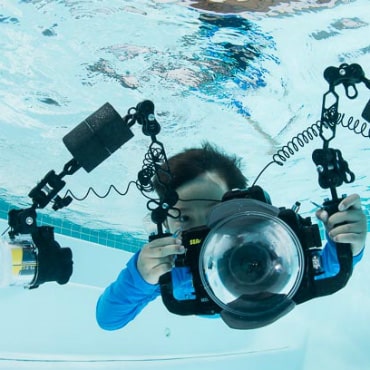
The Nikon Z8 is the answer to everything Nikon DSLR shooters have been waiting for in an underwater camera. With incredibly fast autofocus, 20 fps burst shooting speeds, 45.7 megapixels of high-resolution, 8K/60p and 4K/120p video and no mechanical shutter, the Nikon Z8 is a powerhouse of a camera. While it's similar to the Nikon Z7 II and Z6II, a camera with this many features requires its own underwater settings article. With this article and video, we hope to ease new mirrorless shooters into the newer camera format as well as educate current Z shooters on the top underwater features found in the Z8.
We had the chance to dive with the Nikon Z8 in the warm waters of the Caribbean for two weeks. While it wasn't nearly enough time to explore every feature in the Z8, it was certainly enough experience for us to provide you with our best underwater settings for the Z8. Make sure you read our full Nikon Z8 review for underwater photography and video!

Buttons, Dials, and Ergonomics
The Nikon Z8 carries forward the streamlined ergonomics found in other Z series cameras while giving a nod to it's predecessor - the Nikon D850. The body itself is about 30% smaller than the D850 but 30% larger than the Nikon Z7II/Z6II. The button layout of the Z8 is fairly simple, making it less customizable than cameras like the Sony A7R V and Canon EOS R5. I generally leave my camera in default settings for button customization, as the Fn1 and Fn2 buttons are difficult to use underwater due to their position and accessibility from a housing.
My favorite switch on the Z8 continues to be the photo/video mode switch. It is separate from the mode dial, allowing for quick changes between shooting photos and videos.
Another excellent button is the button on the left side of the EVF. This button allows you to switch between using your viewfinder and LCD - something I do often to review photos on the big screen.
The d-pad on the back of the camera can be used for moving your autofocus point, while the ok button in the center of the camera can bring it back to the center. The joystick can be used to move the AF point more quickly above water.
Aperture and shutter speed are controlled with a front right dial and a back right dial - which can be customized to swap controls or change direction in the menu.
The mode dial has been replaced with four buttons on top left edge of the camera. Your drive mode, white balance, mode, and bracketing can all be adjusted by holding your desired button and using your dials to move the setting. This can be rather tricky underwater, so we recommend pre-setting these four settings before diving.

Playing back your images is very easy - just press the "play" button in the bottom right side of the camera and the zoom in and zoom out buttons to view details.
But by far the button we use the most on the Z8 is the "i" menu button. This button allows for quick access to all your camera's top settings with the single press of a button. We've found that using the "i" menu to adjust ISO is often quicker than setting a dedicated ISO button and adjusting it via a dial while holding it down.
And that brings us to customizing the "i" menu - most important controls should be stored in this menu...
The "i" Menu
In Photo Mode
The "i" menu button is a clear, easy-to-access button on the back of the camera. This is where all important settings need to be accessed with the push of one button. To customize your "i" menu, click "menu", and go to "f1" in your custom settings menu (pencil icon). You can then select any icon and replace it with the setting of your choice. In my "i" menu for photography, I have the following settings:
- ISO
- White Balance
- View Mode (Photo Lv) - Choose whether the camera adjusts the preview in the viewfinder/monitor to reflect shooting settings. Select "Adjust for Ease of Viewing" when using strobes. Select "show effects of settings" when not using strobes.
- AF-area mode/subj. detection - select where on your sensor the camera will select an autofocus point. This is where you can set up autofocus tracking
- Focus Mode - Switch between autofocus single, continuous, and manual focus
- Custom Controls (Shooting) - this setting allows you to quickly get to the menu to set a custom button in case you need to do a quick change underwater
- Metering - set this to spot or center weighted with a TTL converter
- Flash Mode - set this to fill flash with an underwater strobe. You can also quickly turn off your strobe/flash here
- Vibration Reduction - turn in-body image-stabilization on or off (leave on in most cases)
- Flash compensation - use this to adjust the output of your strobe when using TTL
- Choose Image Area - You can choose to shoot in crop sensor mode (DX) with this setting for more "zoom". However, this is the same as cropping your image and results in a drop in resolution.
- Focus Tracking with Lock-On - This setting allows you to set how quickly your camera responds if something passes between the subject and the camera

In Video Mode
What we love about Nikon cameras is that it is so easy to customize your video and photo modes separately. To customize your movie mode, enter your "menu", click the custom settings menu (pencil icon), and select "g1". This will open up your "i" menu for when you are in photo mode. You can select any icon you want to replace with your icon of choice. In my "i" menu for video I have the following settings:
- Picture controls - This sets the hues and tones applied to your video. I select vivid unless I am going to film in RAW or N-Log
- White Balance
- Video Frame Size and Rate Options - set your frame rate and resolution. It's very important to have this setting in your "i" menu if you need to adjust frame rates for quick subjects
- Microphone sensitivity - you can adjust your mic levels if you are using a hydrophone underwater.
- AF-area mode/subject detection - select where on your sensor the camera will select an autofocus point. This is where you can set up autofocus tracking.
- Focus Mode - Choose between manual focus, autofocus single, autofocus continuous, and autofocus full. We recommend autofocus full for a more "cinematic" autofocus
- Electronic VR - generally we recommend keeping this off, but it can be useful in cases where you have large amounts of motion underwater
- Vibration Reduction - This turns in-body image-stabilization on or off. We kept it on "sport" while shooting handheld video underwater.
- Custom Controls - this setting allows you to quickly get to the menu to set a custom button in case you need to do a quick change underwater
- Metering - this allows you to select the area that your camera chooses to calculate custom settings - like auto ISO and white balance. Matrix metering is a good option for video
- Zebra pattern - this setting allows you to turn on zebra patterns and set your highlight threshold. Zebra patterns allow you to visualize where your video may be overexposed with data loss. This can be useful if you are using a picture profile that needs color grading
- Choose image area - this can be a useful setting for "cropping" into DX mode

View Mode (Photo LV)
Although we mentioned this setting in the previous section, it's very important to properly set your live view setting in your camera. We highly recommend you customize your "i" menu to do this. Otherwise, "d8" in your custom settings menu (pencil menu), in the main menu, can be used to update this. When you are shooting with strobes, make sure "adjust for ease of viewing" is selected. Otherwise your screen will appear mostly black. When shooting without strobes, make sure "show effects of settings" is selected so that you can see how your image will change as you change your triangle of exposure.

A Word On Shooting Without a Mechanical Shutter
The Nikon Z8 is a very unique camera. The sensor readout is so fast that the camera no longer has a mechanical shutter. This allows you to take RAW photos up to 20 frames per second. While the Z8 can be very useful for fast subjects, it's overkill if you're shooting with strobes. We recommend setting your drive mode to the continuous low drive setting at 5 frames per second. Many modern professional strobes, like the Sea & Sea YS-D3s, the Scubalamp D-Pro, and Ikelite DS 230 strobes will be able to keep up with this shooting speed. Likewise, we recommend having a CF Express Type B or XQD card so that you do not hit a buffer while burst shooting. However, if you are shooting subjects like sharks and dolphins in ambient light, you could consider shooting 20 fps or 10 fps.
Using Picture Review for Feedback
Likewise, because the camera does not have a mechanical shutter, it is completely silent underwater. You do not feel any vibrations when you press the shutter. This makes it difficult to tell if you have captured a photo - especially if you blink and miss the strobes firing. In order to have some kind of feedback while we were shooting, we decided to turn our image review on to two seconds. This made it so that any time we took a photo, the image would play back automatically. It's a good strategy for checking focus and lighting. If you need to take another photo, you can press the shutter button or back button autofocus without interruption. To turn on image review, go to the "menu", enter the "playback" menu, select "picture review", and finally, select "on (monitor only)". After that you need to select the length of time you want the photo to display on the screen. To do this, go to the "menu", enter the "custom settings" menu, select "c3: power off delay", and finally set the "picture review" time to 2 seconds.

Top Photo Shooting Menu Items
The Nikon Z8's menu is extensive. You could spend days going through each possible feature. We've decided to highlight the features in each shooting menu that we think are most pertinent to underwater photography. Let's start with the shooting menu:
- Shooting Menu Bank - Menu options can be stored in up to four banks that can be selected in the shooting menu bank.
- Primary Slot Selection - you can select which card will store your photos
- Image area - Select your aspect ration
- Image quality - Choose to shooting in RAW for the best results while editing.
- RAW Recording - choose the quality of your RAW files. We recommend the highest quality (high efficiency *)
- Color space - we recommend sRGB
- Active D-Lighting - off (do this in lightroom)
- Long Exposure NR - off (do this in lightroom)
- High ISO NR - off (do this in lightroom)
- Vignette Control - Normal
- Metering - Spot or center weighted
- Flash Mode - fill in
- AF-area mode - 3D tracking (animal subject detection selected)
- AF Subject Detection Options - Animal
- Vibration Reduction - On
Top Video Recording Menu Items
- Shooting Menu Bank - Menu options can be stored in up to four banks that can be selected in the shooting menu bank.
- Destination - Choose which card slot records video
- Video File Type - Select your video file type with the option of selecting N-RAW, ProRes RAW, H.265, and H.264. Select a higher bit rate if you intend to do more color grading with your footage. You can choose your tone mode including, SDR (normal dynamic range), HLG, and N-Log (for color grading)
- Frame Size/Frame Rate - we recommend 4K/60p for most underwater filming, 4K/120p for fast subjects or handheld macro, and 8K/60p for subjects where you want more of a crop in your final product.
- Video Quality - select high quality
- Extended Oversampling - turn this on to improve image quality
- ISO - we recommend setting this from the "i" menu
- White balance - we recommend setting this in the "i" menu
- Set Picture Control - if you're not using N-Log, we recommend "vivid"
- Active D-Lighting - default
- High ISO NR - default
- Vignette Control - default
- Diffraction Compensation - default
- Metering - matrix
- Focus mode - AF-F
- AF-Area Mode - large or 3D
- AF Subject Detection Options - animal
- Vibration Reduction - Sport
- Electronic VR - off
- Microphone Sensitivity - lower levels slightly when using a hydrophone or shotgun mic

The Custom Settings Menu
Many important settings found in the custom settings menu have already been mentioned previously. Therefor, we are only going to mention a few more important settings in this section. Most other settings can remain on default.
- a1: AF-C Priority Selection - keep this on the default setting (release). This will allow the camera to take a photo whenever the shutter is pressed
- a1: AF-S Priority Selection - keep this on the default setting (focus). This will require the camera to acquire focus before taking a photo when you press the shutter (more accurate than AF-C)
- a3: Focus Tracking with Lock-ON - decide how quickly the autofocus point will move off of your subject when blocked
- a6: AF activation - you can set your back button autofocus with this setting (and whether or not it is activated by the shutter)
- a12: Built-in AF-Assist Illuminator - turn this setting off (your camera is in a housing and doesn't need it)
- a13: Focus Peaking - turn this on and set the color to your desired color. This will help you see the area that is in focus in manual focus mode
- c3: Power Off Delay - this setting can adjust how long it takes for the camera to fall asleep or how long your play back image remains on the screen
- d1: Continuous Shooting Speed - this allows you to select how fast your camera takes photos in burst mode
- f2: Custom Controls (Shooting) - this allows you to customize the functionality of your buttons
- f5: Reverse Dial Rotation - you can reverse the direction your dials scroll to adjust aperture and shutter speed
- g2: Custom Controls - this allows you to customize the functionality of your buttons in video mode
- g6: AF speed - control your autofocus speed in video mode
- g7: AF Tracking Sensitivity - control how "sticky" your autofocus tracking is in video mode
- g12: Zebra Pattern - setting your zebra levels to visualize overexposure in your video
- g18: Red REC Frame Indicator - turn this on so you have a "tally" light in your LCD while recording

The Playback Menu and Network Menu
Other than picture view, which we mentioned in an earlier section, you can leave the playback menu and network menu on default.
The Setup Menu
Many of the settings in the setup menu just need to be set once. That said, there are important settings in this menu to know about. Here are the most important options for underwater photography:
- Format Memory Card - Finally! Someone has placed the format memory card in the top slot. This allows you to delete all your images and wipe your card.
- Auto rotate info display - choose whether your camera rotates the screen when you rotate the camera (we recommend locking it so it doesn't underwater)
- Clean image sensor - while it doesn't work great, you can remove sensor dust with this setting
- Camera sounds - we recommend turning off camera sounds as you can't hear the shutter sound underwater
- Battery info - this setting gives you more detailed info on how much battery life you have left
- Firmware Version - you can check your firmware here to see if your camera needs an update.

Conclusions
Because the Nikon Z8 is equipped with all the same features as the flagship Nikon Z9, it can be a daunting camera to study when you first pick it up. But once you get your "set and forget" settings all taken care of, the learning curve with the camera is fairly quick. The Z8 is set up to give you the best possible and most convenient shooting experience Nikon has to offer. And now that you are equipped with our Nikon Z8 underwater settings guide, you have everything you need to dive-in. Also, to read more regarding the best underwater housing for the Nikon Z8, visit our Nikon Z8 Underwater Housings guide.