Guide to Shooting with the Olympus OM-D E-M1
March 24th, 2014
Guide to shooting Underwater with the Olympus OM-D E-M1
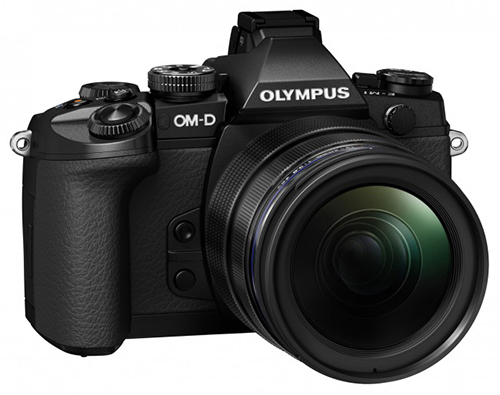
The Olympus OM-D EM-1 is high end mirrorless camera from Olympus. This camera takes the original E-M5 to a new level, check out our guide for taking this great camera underwater. It has since been replaced by the Olympus OM-D E-M1 Mark II.
Advantages to the E-M1:
The OM-D E-M1 stands out from other cameras for several reasons. Compared to the other camera in the OM-D line, the E-M5 there is a noticeable difference in focus speed, especially when using the popular 60mm macro lens. The E-M1 also has a higher flash sync of 1/320, great for sunballs and more customization ability for setting up the rig exactly as you want. The improved sensor also offers better detail and image quality.
Compared to a compact camera like the Sony RX100 VI, Olympus TG-6 or Canon G7X Mark II, you get a larger sensor and full manual controlled experience. The ability to interchange lenses on any mirrorless camera like the E-M1 allows for better quality overall with more specific shooting (wide angle and macro without wet lenses).
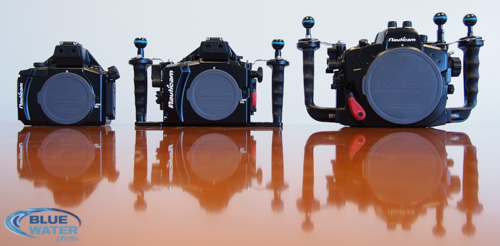
Size comparision on E-M1 vs other housings. Left to Right Nauticam E-M5, E-M1, D7100
The size is still smaller than any dSLR camera making it a great choice for folks looking to upgrade from a compact or down grade from a dSLR when size is an issue. The focusing speeds compete with many of the entry level dSLR's on the market and are just slightly slower than some of the top end cameras like the Canon 70D. The digital viewfinder is not quite as good as an optical one, but its by far the best available, with nearly zero lag and great detail on the viewfinder image.
Dive Travel with the E-M1:
We've done dive trips with the E-M1 while diving Tiger Beach, doing scuba in Tanzania, and experiencing the best diving in Thailand.
Lens Selection:
With the E-M1 underwater you have the full range of Micro-Four Thirds lenses to choose from. Here are our top picks and why.
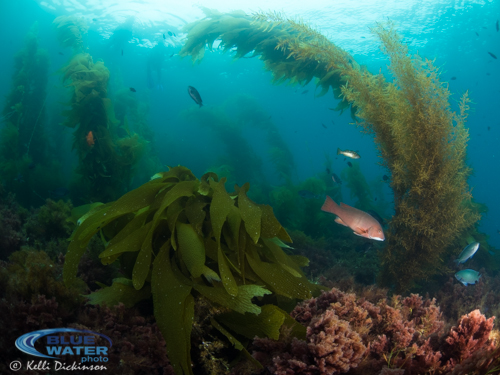
Panasonic 8mm Fisheye - this is my go to lens for wide angle, super sharp with an incredible 180 degree field of view you can easily create beautiful sweeping reef scenes, and photograph large subject. One caveat - is you have to get close. This lens is perfect for close focus wide angle shooting, wrecks, large animals you can get close to and all manner of landscape / reef shots.

Sheephead Passing By - E-M1 w/ 8mm Fisheye, ISO200, F10, 1/100
Olympus 9-18mm - For those who want a little bit more flexibility, or desire a rectinlinear (non-fisheye) lens, this is a great choice for wide angle. 100 degrees field of view at 9mm allows you to take great landscape and reef shots. The flexibility to zoom in to 18mm (60 degree field of view), makes this a great option for when you can't get close to your subjects. This is also a great option for those who want to be able to zoom in and out and have some flexibility in thier lenses.
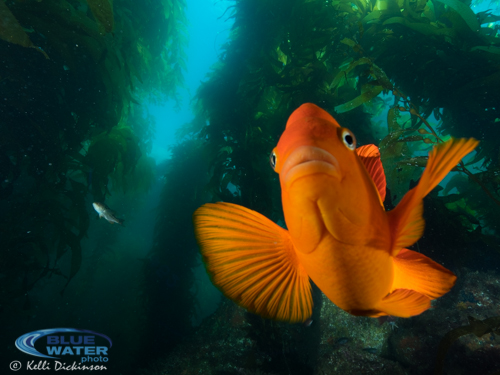
Garibaldi in the Kelp Forest - E-M1 w/ 9-18mm @ ISO200, F8, 1/125
Another great option for rectlinear wide angle is the Panasonic 7-14mm. This lens offers a slightly wider field of view of 114 degrees, and is a little bit sharper overall. At a much higher price point though, we still recommend the 9-18mm in general.
Olympus 12-50mm - This is the perfect lens for those who want maximum flexibility, or a single lens set up. The 12-50 is typically used behind the flat port the benefit to this lens is the built in macro function. Together you can get a semi-wide field of view at 12mm and a great 43mm macro lens all on the same dive. (Note - currently only Nauticam offers a zoom gear for this lens that allows use of both the standard zoom and macro mode).
Olympus 12-40mm PRO - This new pro lens has some serious glass and is very sharp and fast focusing. However underwater, the mid-range zoom is not great. I'd look at this lens only for fish portraits, fashion or if you have a specific need of a mid-range zoom lens.
Olympus 60mm Macro - This is our top pic for macro lenses. Very quick to focus with the E-M1, with minimal hunting it offers a great 1:1 macro, and the long focal length means you get great magnification, this is perfect for macro and super macro as well as fish portraits (smaller to medium fish).
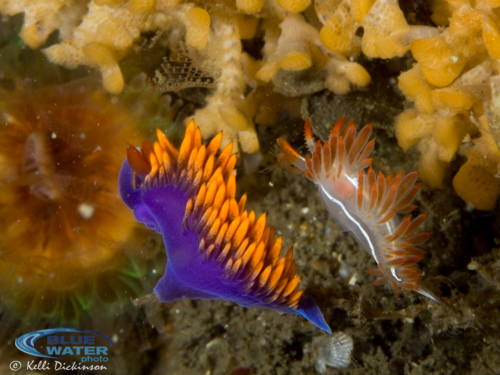
A Pair of Nudibranch - E-M1 w/ 60mm Macro, ISO 200, F22, 1/320
Another great option for macro if you want a little more flexibility is the Panasonic 45mm Macro. This lens is much more expensive than the 60mm, but at 45mm you can shoot some larger subjects without having to be too far away. Both lenses are great options for macro.
Important Initial Settings:
The E-M1 requires a few things to be set before using it in any housing. Here are the two key settings to change in order to have an enjoyable shooting experience.
-
First, you'll want to turn ON the "Live View Boost". This allows the LCD screen to remain bright regardless of camera settings, which is extremely useful underwater when often our camera settings are set to block all ambient light.
- Custom Menu -> D: Disp/PC -> Live View Boost -> On
-
Next, you'll need to turn OFF the "EVF Auto Switch". The default on the camera is on, which means when you bring the camera up to your eye it automatically switches to the EVF from the LCD. In any housing that sensor is blocked, so it will only show the EVF unless turned off.
- Custom Menu -> J: Built-In EVF -> EVF Auto Switch -> OFF.
Once these two settings have been changed you can enjoy full use of your E-M1 in an underwater housing. Of course, there are so many more customization options to really fine tune the functionality of the camera that I highly recommend taking the time to go through the custom menu options, get familiar with the different buttons and set up the camera to suit your needs.
You can also read through our "Best Underwater Settings for the OMD" article on the Underwater Photography Guide. That article covers all Olympus mirrorless cameras, so when something is E-M1 specific it will be noted.
The Shallows - E-M1 w/ 8mm Fisheye, ISO 200, F8, 1/125
Camera Settings - Where to Start:
For either wide angle or macro there is usually a base setting that I will start with on the camera when i hit the water. This allows me to quickly fine tune the settings based on the actual conditions quickly and begin shooting sooner.
Macro - F18, 1/320, ISO 200* - with macro you typically want to shoot at the higher F stops for the best depth of field, F18-22 is where I typically am. To block all ambient light its easiest by putting the camera at the max sync speed, and keep the ISO as low as possible. *I don't use the ISO LOW option which simulates ISO100, as it is not a true setting, but more of a software manipulation to offer an extended ISO setting. The best quality is still at ISO200.
Wide - F8, 1/125, ISO 200 - as I am typically shooting in Southern California, where we often have darker seas and lower visibility, I start with a slower shutter speed to guage the background exposure. Once down I will do a quick series of test shots (the joy of digital!) and adjust my shutter speed, and aperature if needed. I try not to bump up the ISO, but if needed the E-M1 performs really well up to ISO 1600.
For shooting in brighter, clear tropical waters, I would recommend starting around F8, 1/250 or even 320. The brighter sun will require the faster shutter speed in order to capture those nice sunball shots.
Additional Tips:
Once you have the camera down, there are always small things you can do to help make the overall shooting experience more enjoyable.
For me, the most important of these is getting your set up properly neutral, or as close to as possible.
Stix Floats - this are useful for fine tuning buoyancy. On a recent test I used the Nauticam housing with 5" and 8" Ultralight arms. With the 60mm Macro lens, Dual YS-D1 Strobes and a L&M Sola 1200, the rig was nearly neutral with 6 of the Stix FUL-3 Jumbo floats. Change to the 8mm Fisheye lens and remove the focus light and it was slightly positive at the surface, but pretty much perfectly neutral at depth.
Nauticam Carbon Fiber Float Arms - You can use these arms to substitute for standard arms, or create a bridge on the housing to add buoyancy. The arms come in different sizes which offer a variety of buoyancy addition allowing you to pick the best configuration to minimize the weight underwater
Another important tip that I find useful, is to make use of the AEL/AFL function and set the camera so you can use the AEL button, now properly positioned with the housings as a lever (both Nauticam & Aquatica housings) which makes it easy to use for focusing. Check the UWPG Settings article for more information on setting that up.
Competing Mirrorless Cameras
The Panasonic GH5, Sony A6400, and Sony A6500 all compete with the Olympus OM-D series. The Panasonic cameras excel in video, while the Sony cameras have a larger sensor, extremely fast focusing and great dynamic range. In addition, you can get a high-quality low-priced Fantasea housing for the Sony cameras.
Housing Options
Four manufacturers are making housings for the E-M1. These include Olympus, Nauticam, Aquatica and Recsea.
Nauticam - They produced a great housing for the E-M5 and built off of that model to make an excellent E-M1 housing. Designed like thier dSLR housings, the E-M1 includes molded grip handles and has the same lever release for shutter and AEL as is common with the Nauticam dSLR housings. The port release is much nicer, the same as dSLR housings. As always ergonomics are key with all buttons and controls well placed, easy to reach and a breeze to use.
Aquatica - New to the Micro Four-Thirds world, Aquatica is producing a housing that looks like it will be a good competitor to Nauticam. Rugged and well designed the housing offers access to all controls and also was engineered with the same precision they engineer all of their high quality dSLR housings. Due in around the beginning of April.
Olympus - The budget option. The Olympus housings are polycarbonate, and look very similar to the popular PEN housings. The E-M1 looks to be a duplicate of the E-M5 with updated buttons and controls to match placement on the new camera. The housing has an easy to use removeable bayonet port system, but is limited on port and zoom gear selection.
Recsea - Another new comer to the Micro Four-Thirds world, Recsea has a lot of experience with compact and mirrorless housings for the NEX line. Another high quality aluminum housing manufacturer, we expect this housing to be one of the smallest as usually the Recsea housings fit the camera like a glove. Expected to start shipping around mid-April.