Diving Fiji with the Sony A6700 Dream Setup
Posted by Nirupam Nigam on April 18th, 2025
Though it went unnoticed by many photographers, when Fantasea discontinued their Sony A6400 housing during Covid, it represented the end of an era of affordability in our hobby. It was the perfect budget camera-housing combination that offered pro-level image quality, a compact design, and most importantly, the ability to shoot both wide angle and macro photography on the same dives by swapping out wet lenses.
Although anodized aluminum housings like the Nauticam Canon R50 and the Isotta Sony A6600 also have flat ports compatible with kit lenses (and wet lenses), they don't offer the same price points and weight consideration.

Fortunately, after years of nagging from Bluewater, Ikelite has released a similar system to the popular Fantasea Sony A6400. The Ikelite Sony A6700 with a fixed port was designed over the course of a couple of years, and I had the lucky opportunity to take it for its first test drive. This "dream system" is lightweight, compact, and the image quality of the Sony 16-50mm PZ kit lens combined with Fantasea and Inon wet optics is incredible. I dove with the first protype during our underwater photoworkshop to Fiji in October, 2024.
How it works
I paired the camera with the Sony 16-50mm PZ kit lens (as it's the only lens you can pair with the system) as well as the Fantasea UWL-09F wide wet lens and Fantasea bayonet system. For lighting I used a pair of pro-level Ikelite DS 230 strobes and Ikelite’s Sony TTL converter. The final version of the housing has two versions – one with a built in TTL converter that only works with Ikelite strobes. But if you have sync cords you want to use with other strobes, ask us how you can bypass the TTL circuit to use them. The second version of the housing has a built in fiber optic trigger that can work with just about any strobe. This system can be used with just about any combination of wide and macro wet lenses, so feel free to reach out to us for our recommendations via chat and email and we’re happy to help. Though the primary Ikelite A6700 housing does have interchangeable ports, the two Ikelite housing versions that are compatible with the famous Sony 16-50mm kit lens have fixed ports. They can be converted to interchangeable ports by a dealer, or we can always get on a zoom call to show you how to do it.

A Fiji Reef Scene Captured with the Sony A6700 in an Ikelite housing with Dual DS 230 Strobes and TTL
Wide Angle Image Quality
It’s a common understanding among photographers that the cheap kit lenses sold with your first photo “kit” are not always the best quality. This is certainly true for topside photography. But as with every aspect of our hobby, things get a little different underwater. When you pair a lens like the Sony 16-50mm PZ with a wet wide angle lens like the Fantasea UWL-09F, the camera no longer focuses on the lower-quality virtual image of a dome. Instead, it focuses on the subject you are actually shooting, as an above water lens would. This is called water contact optics. It eliminates some of the image quality issues created by traditional dome port shooting. Your corners behind a wet lens get sharper and more detailed.

Wire coral captured with the Sony A6700
Keep in mind, that the Sony A6700 shoots 26 megapixel photos with an APS-C sensors. Although these cropped sensors have a 1.5x crop from full frame, they have much better detail, low light performance, and dynamic range than the 2x cropped micro four thirds Olympus/OM system sensors, and better image quality than further cropped compact cameras.

You can see why they call it Mellow Yellow
I found that my wide angle shots in Fiji were incredibly detailed and the color rendition from the Sony A6700 is vastly superior to the older Sony a6400 – which I found had a few minor issues with white balance (as did many others). The files from the camera were so much easier to edit than past Sony a6000 series models. The angle of coverage with the lens was not quite as wide as a traditional fisheye lens, but I was still able to focus very close – almost as to the glass!
Underwater, I was often zooming-in with the kit lens while using the wide angle optic, in order to change my angle of view and make the small anthias in my photos look larger. Doing so added some background separation leading to a more interesting perspective.

Getting close with the zoom allowed me to capture a different style of reef scene with larger individual fish
Macro Image Quality
Likewise when you pair the Sony 16-50mm with a macro lens like the Bluewater +7, the image quality is also excellent, and the camera again focuses on the subject instead of the virtual image. There are a couple of quirks to overcome with macro wet lenses (aka, diopters). Diopters shrink the minimum focusing distance of your lens and introduce a maximum focusing distance where you can no longer focus to infinity. This gives you a relatively small focal range where you need to be within a few inches of the subject to get proper focus. While this can be a little frustrating to get used to at first, a little bit of practice goes a long lens! I shot a kit lens with a diopter as my primary system for the good part of a decade.

One of the few close up portraits I captured with the Sony A6700 in Fiji - the wide angle opportunities were just too good!
The second effect of a diopter is a shortened depth of field. This means you’ll need to increase your f-stop on your camera to deepen your depth of field – unless you want some nice bokeh (blur) behind the subject.
During my time in Fiji, I found that I infrequently switched to the macro diopter or even the kit lens by itself. I was enjoying the wide angle colors way too much! That said, I did get a few close up portraits with the kit lens. I’m very excited to take this system on our upcoming underwater photoworkshop to Anilao, Philippines – the macro capitol of the world.
Electronic Zoom Capability
One of the benefits of the Sony 16-50mm PZ kit lens in particular are the two letters “PZ”. PZ stands for “power zoom”. This means you actually don’t need a zoom gear with this lens and the Sony A6700. All you need to do is follow our Sony a6700 underwater settings guide and assign custom functions to your “middle” and “down” buttons on your d-pad to zoom in and out. This allows you to easily zoom at the push of a button. I found this much easier to use than a zoom knob where you have to reach up and it distracts from shooting.

Zooming in just a tad allowed for more details in this photo of soft coral captured with the Sony A6700 and Fantasea UWL-09F in an Ikelite housing
An Underwater Video Powerhouse
It’s worth mentioning that the Sony A6700 is a video powerhouse in its own right and a massive upgrade from previous A6000 camera models. The camera is capable of shooting 4K/120p video (with a crop) and is equipped with Sony’s popular logarithmic profiles like S-LOG3. These picture profiles allow you to capture better details in your highlights and shadows, similar to a RAW file. 5 axis in-body image stabilization is also a nice benefit which made shooting hand held video in Fiji very easy. The footage was much less jerky than with other cameras that don’t have IBIS
Lightning Fast Autofocus
Fiji can have a lot of quick action shooting situations – from the sharks at Beqa lagoons to the colorful reef fish moving across the reef. It’s important to have a good autofocus system in these scenarios. Fortunately, I had a great one. The A6700 is equipped with Sony’s most updated, state-of-the-art autofocus system. For most of my shooting in Fiji, I kept the camera in AF-C (continuous autofocus) mode. Then I scrolled down to the last setting in the autofocus area mode – autofocus tracking. I found that using a medium autofocus point was perfect for locking on to a fish and following it as it moved around the screen. While the animal eye autofocus tracking is still not advanced enough to consistently find animals or animal eyes underwater, it did a decent job. And when that didn’t work, I could place the focus box directly over where I wanted it to go.

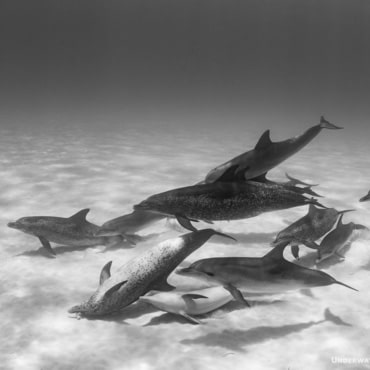
Fast autofocus is necessary for photographing quick subjects like this passing bull shark
Underwater Lighting
Although your underwater lighting options with the Sony A6700 are the same as other cameras, I think it’s important to talk about the built in TTL converter with the sync cord version of the Ikelite housing. If you don’t already have strobes, we strongly recommend considering the compatible Ikelite DS160 Mark II or Ikelite DS230 strobes. There’s no charge for the built-in converter, and because it’s an electronic sync connection, this TTL combination is one of the most accurate on the market. I used the same circuitry in Fiji and almost every shot was spot on in exposures – with infrequent blow outs or underexposure. This is because Sony pairs its spot metering point with the autofocus point, unlike other cameras. So if you use spot metering mode, chances are that your subject will be properly exposed.

Accurate TTL made it easy to capture beautiful reef scenes with spot on exposures
Who is the Sony A6700 Dream Setup For?
The Sony A6700 “Dream System” is for three types of photographers:
- The budget conscious, image quality buff – If you want the best image quality per dollar spend for both wide angle and macro, it’s hard to beat the Sony A6700 – especially with tariffs affecting pricing from Chinese and other foreign brands. When you consider that wet lenses are often more affordable than dry lenses, the total package is often a better buy than a traditional port system. The APS-C image quality of the camera is almost undiscernible from pro level full-frame cameras.
- The “all in one” shooter” – The whole point of the “dream system”, after all, is to capture both wide angle and macro shots on a single dive. This becomes much easier if you use a bayonet system like the Fantasea bayonet. Then you can mount lenses that you are not using on the arm of the camera. We did this in Fiji. While I didn’t use it very often due to the incredibly consistent wide angle opportunity, it’s a great feeling to know you won’t miss an opportunity on a dive due to subject size. Keep in mind, you can take off the wet lenses completely and just shoot the kit lens for portraits!
- The “I hate carrying a bunch of lenses and ports” shooter – If you’re the kind of photographer that doesn’t want to carry a bunch of different dry lenses and ports, this is the system for you. Of course, you’ll still need to carry wet lenses if you want them. But you won’t need to swap ports between dives or forget them on your trip, like I did on my way to Anilao this year with the Nikon Z50 II.

Conclusions
Overall, Fiji was the perfect place to pair a versatile camera with versatile diving. The Sony A6700 dream system from Ikelite is a combination that we’ve been waiting years for – an easy-to-use kit that allows you to shoot wide angle, macro, and portraits on the same dive with excellent, affordable image quality. I think the results from Fiji speak for themselves. So if you’re one of the photographers I described, reach out to our knowledgeable sales team at Bluewater Photo and we’ll get you set up!

Another explosion of color captured with the Sony A6700